May 27, 2010

Strawberry Barley Scones


Oh, where do the days go.  I made these lovely scones last Saturday for the Good to the Grain Potluck held at 18 Reasons in San Francisco.  The potluck entailed each of the 25 attendees baking something from the book and bringing it to share, including author Kim Boyce.  We then spent the evening trying each others baked treats and discussing the recipes.

It was so fun to try each of the tasty creations, especially because they were made with a variety of whole-grain flours. And it was a perfect excuse to purchase Good to the Grain, a forward-thinking cookbook that had been on my list of must purchase items.  Kim does an excellent job of walking readers through the different types of flour, ranging from whole-wheat to teff to barley via breads, muffins, granola's and much more.


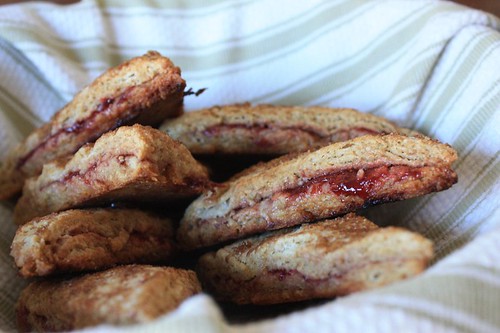
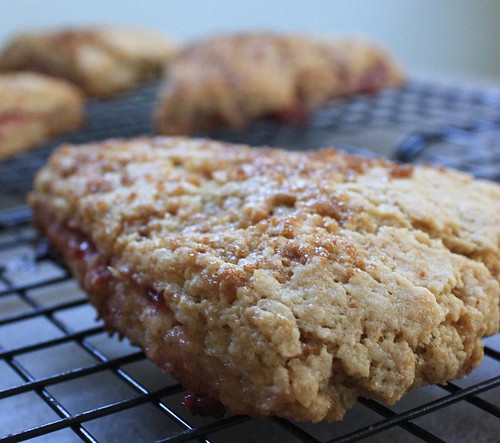
I chose to make the strawberry barley scones because I'd never tried barley flour and I had a fresh batch of homemade strawberry jam just waiting to be put to good use. I followed the recipe fairly closely, for those of you that have seen the book.  As far as scones go these came together quickly (less than 30 minutes) before I popped them in the oven.


I can't wait to work my way through the rest of Kim's recipes.  A couple good ones that I remember from Saturday are the Olive Oil Cake with spelt flour and rosemary (check out this version shared with everyone on Saturday), and the Iced Oatmeal Cookies with multi-grain flour - which tasted just like Mother's Iced Oatmeal Cookies. If your looking for a simple stand out recipe that will impress I would recommend giving these a try.


Strawberry Barley Scones
from Good to the Grain by Kim Boyce

butter for the pan

1 cup plus 2 tablespoons barley flour
1 cup all-purpose flour
1/4 cup dark brown sugar
2 teaspoons baking powder
1/2 teaspoon baking soda
1 1/4 teaspoon kosher salt*
1/2 cold unsalted butter (1 stick)
1/2 cup buttermilk
1 egg
1/2 cup Strawberry Jam
1 tablespoon unsalted butter
1 tablespoon dark brown sugar

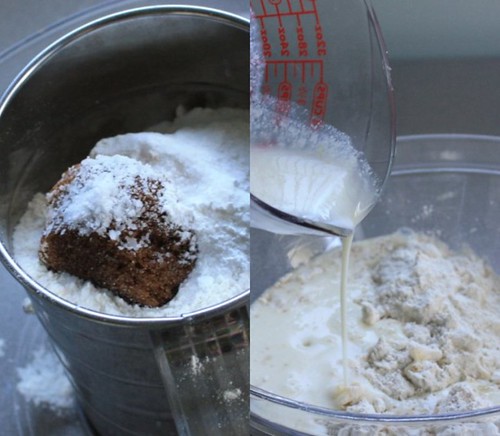
Preheat the oven to 350 degrees F, and place a rack in the center of the oven.  Rub a baking sheet lightly with butter.  Sift the dry ingredients, flour through salt, into a large bowl, pouring back into the bowl any bits of grain or other ingredients that may remain in the sifter.

Cut the butter into 1/2 inch pieces and add them to the try mixture.  Using your hands, toss the dry mixture with the butter until it is thoroughly coated. Starting from the back of the bowl and working forward, pinch the pieces of butter between your fingers breaking it into smaller bits.  Continue rubbing until the butter is about the sizes of peas.  Be sure to do this as quickly as possible in order for the butter to stay cold.

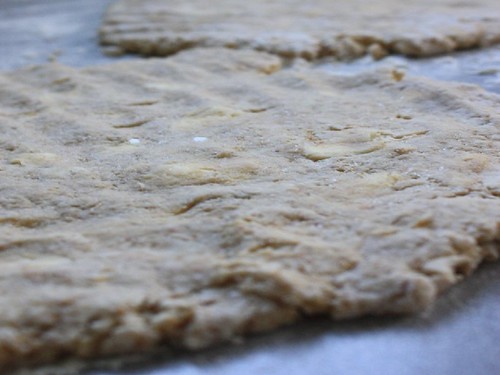
In a small bowl, whisk together the buttermilk and egg until thoroughly combined.  Scrape the buttermilk and egg into the dry mixture, and mix until barley combined.  Use a spatula to transfer the dough onto a well-floured surface.  If the dough is too sticky to handle dust it with flour and fold it together a few times.  Divide the dough into 2 equal size pieces.  Flour your hands and pat each piece of dough into a disk about 1/2 inch thick and approximately the same size.

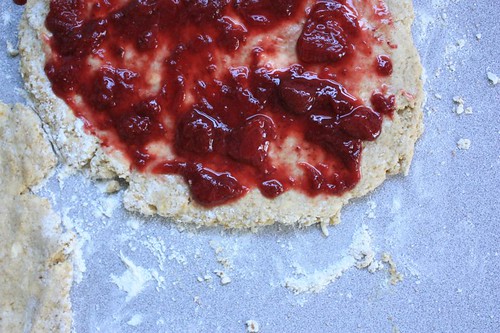
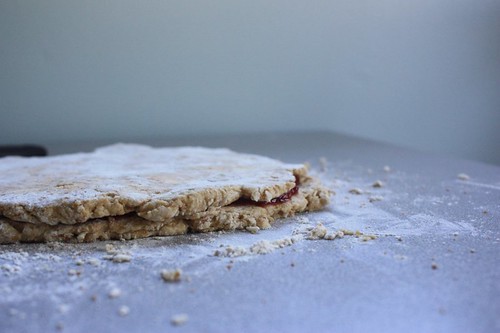
Cover one disk with the jam or marmalade. Place the other disk on top of the jam and press down gently so that the dough settles into the jam.  (I found an offset spatula very helpful to ease the 2nd round of dough off the counter and onto the jam.) Brush the dough lightly with melted butter and sprinkle with sugar.  Use a sharp knife to slice the circle into wedges, like a pie.  Carefully place the wedges on the prepared baking sheet, leaving a couple inches between them.

Bake the scones for 20-25 minutes, rotating the sheets halfway through.  They are ready when their tops are golden brown and some of the jam has bubbled over onto the pan.  To keep the scones from sticking to the pan, slide a thin spatula underneath them while they're still warm and move them to a baking rack.  The scones are best eaten warm from the oven or later that same day.

*Kim made a note about using kosher salt that was new to me so I'm passing it along here (in case you don't have it).  She says, "You can substitute sea salt or any common table salt you have on hand, but you'll need to adjust the amount you use because sea salt weighs twice as much as an equal measure of kosher salt (depending on the brand). Food scientist and cookbook author Shirley Corriher uses this formula: 1 tablespoon of table or sea salt = 1and 1/2 tablespoons Morton kosher salt = 2 tablespoons Diamond Crystal kosher salt." This recipe is based on using Diamond Crystal kosher salt, so adjust accordingly. 

Stats: Makes at least 8 medium size scones
Time: 1 hour, less than 30 minutes active time
Seasonal/local ingredients:  The butter was from Clover Creamery, and my strawberry jam was homemade from organic strawberries I picked up a couple weeks ago at the Berkeley Farmer's Market.

happy baking,
alison

May 19, 2010

White beans & Veggie Pot


I pulled this recipe together last week on a whim. I wanted to do something with dried beans, as I need to start working through my growing pantry. I can't help getting a little bag of some new ingredient when I'm in the bulk section of my local natural grocer. Needless to say my beans are starting to pile up.

In the morning I soaked a bowl of them, with the intent of making myself use them that night. But when I got home tired, and thinking about an evening appointment that night, I was pretty ready to order pizza instead of deal with the beans.


Lacking any great sense of culinary creativity I decided to make a vegetable pot of sorts, with beans. Basically I pulled out anything I had left in the fridge from the week: half a potato, a random bell pepper, the last few stalks of celery...you get the idea. By using the dutch oven I was able to pour everything in the pot and bake it while we were away at the appointment. Though I wouldn't really recommend leaving the oven unattended - it was well worth coming home to a hot-cooked dinner.


If your ever in a pinch, and you have some dried beans you need to use, let this recipe be your guide. Many veggie combinations would do, you could substitute the white beans for another variety, or use this as a lovely side dish for a bit of light fish or chicken.


White beans & Veggie pot

1 cup Great Northern White Beans
1 tablespoon olive oil
2 cloves of garlic, finely chopped
1/2 medium onion, chopped into 1/2 inch pieces
1/2 potato, washed and chopped into 1/2 inch pieces
1 bell pepper, chopped into 1/2 inch pieces
3 stalks of celery, chopped into 1/2 inch pieces
1/4 cup spinach
3 sprigs fresh oregano
1 1/2 cups broth, either chicken or vegetable
salt and pepper to taste

Soak beans in water all day.

Preheat oven to 325 degrees F. Drain the beans. Heat oil in a dutch oven and slightly brown the garlic. Add onions and stir until they start getting soft. Then add potatoes, bell pepper, celery and greens and stir until thoroughly mixed and coated. Add the beans and stir in broth.

Place the lid on the dutch oven and bake for 1.5 hours. Pull out of the oven and stir in salt and pepper to taste. This dish is very versatile and I could see adding more veggies (just be aware of the cooking liquid to make sure nothing burns while it is baking), or you could add pancetta or something similar once the beans are finished baking.

Stats: Serves 4
Time: 1 hour 45 minutes, with all day soaking. Only 15 minutes of active time.
Seasonal Ingredients: The veggies I used were the ones left in the fridge at the end of the week. Everything was from the local market except the bell pepper, which is from Mexico, but I couldn’t resist its beautiful bright orange color.

happy cooking,
alison

May 17, 2010

Flatbread Lasagna


I love magazines. Not all mag's mind you, anything related to cooking and food - love. Any design, home improvement, get-fit mag, natural living mag - love, love, love. It's such a treat when I fly somewhere and to pick out a couple for the trip. Although I've found that it's better to get the cooking ones on the way home, that way I don't have to lug them around for the whole trip. It only took a couple years to figure that out!


Last month coming home from somewhere I grabbed the April issue of Food & Wine. I used to be a subscriber and still love it. I'm not usually one of those read the end of the story first kind of people, but I always turn to the last page for the "last bite" section which features some yummy pastry, or dessert. I can never resist trying those recipes.


Anyways, over the weekend I was scrolling through the recipes I marked to try and this one caught my eye. I don't have a good standby lasagna recipe and using flatbread instead of noodles definitely sounded different.


Overall I was happy with how it turned out. The whole wheat bread made it seemingly healthier and the soaked up all the sauce and cheese nicely, making a good base. The second night we re-heated it in the oven and got that nice crispness that makes everything a bit chewier. This is definitely a dish where the first night is good, but the second is better.


Flatbread Lasagna
from Food & Wine

1 pound hot Italian sausages, casings removed
1 and 1/2 cups ricotta
salt and ground pepper
3 cups jarred tomato sauce (I used my homemade tomato sauce, but any marinara would work)
4 whole wheat pita (or naan)**
2 cups shredded mozzarella

Preheat oven to 350 degrees F. In a skillet cook the sausages over medium heat and break up the sausages until thoroughly cooked and browned. In a small bowl season the ricotta with salt and pepper and mix it well. Spread 1/2 cup of the tomato sauce in a large pie plate (if you have a deep-dish pie plate use that).  Top with one flatbread, half of the sausage, and 3/4 cup each of the ricotta and mozzarella (see side note below). Start again with the sauce and layer everything again.

Side note: If your using a deep dish pie plate you will probably be able to layer everything twice more in which case you should use 1/3 of the sausage to start and 1/2 cups of the cheese.  I used just a normal plate and found that only two layers fit.   

After the last layer top with another 1/2 cup of the tomato sauce and the last flatbread.  Top with the remaining 1 cup of sauce and 1/2 cup of mozzarella.  Create a foil tent and place your pie plate on the top shelf in the center of the oven.  I recommend putting a sheet pan underneath the plate to catch any drippings.  Bake for 30 minutes with the foil on, then uncover and bake for 30 minutes longer.  Let it cool for 15-20 minutes and serve. 

**The original recipe called for pocketless pita or naan, to make this a little healthier I used whole wheat pita.  With all the sausage and cheese not sure if I can really call this a healthy dish though...whole wheat or not.

Stats: Serve 6, with leftovers
Time: 1 hour, 40 minutes, but only 20 minutes active time
Seasonal ingredients: No seasonal ingredients for this one, although I did use the tomato sauce I jarred a couple weeks ago.

happy cooking this week.
alison

May 16, 2010

Sunday Picture - Grow little seeds grow

I spent Saturday afternoon working on my little deck garden. Do you remember when the seeds had just sprouted? My how far they've come. A couple times today I walked out to "check" on them, and without fail every time I felt a huge smile come across my face.  So I thought for the Sunday Picture this week I would post a little tour of my growing garden.  There are...

2 kinds of green beans...

...lots of tomatoes, a little basil, and other herbs...

...4 kinds of tomatoes to be exact, here's the baby cherry...

...and loads of winter and summer squash, bibb lettuce, spinach and cucumbers.


Hope you all had a lovely weekend, I'll be back tomorrow with a different kind of lasagna.
alison

May 14, 2010

Chocolate Truffles


After a couple weeks in Spain it's been nice getting back in the kitchen and especially baking.  I've made some lovely uber-light chocolate butter cookies, churned up a batch of strawberry flecked ice-cream, whipped up a little strawberry jam, and made these fabulous truffles.  You could say I went through a case of withdrawal and I didn't even realize it.

And just to clarify, it isn't all for me...hehe, though I have tried it all. Yum.


The truffles were actually for a friends birthday party.  The only request from the host was to bring something chocolaty and not cake-like.  Truffles seemed like the perfect solution.   Just to warn you, they are a bit messy, as in all over my hands can't take a picture messy, but as you can imagine well worth it.  As truffles go these were fairly light and worked well as a compliment to the strawberry pie and cupcakes also sat on the dessert table.  I used Cognac as a light flavoring, however they would probably be good with any number of liqueurs.  I can definitely see making a peppermint version during the holidays.


Or using Frangelico as a flavoring and then coating the outside in toasted hazelnuts, that would be nice too.  The base is easy enough which allows for room to play with the other flavors.  If you come up with any good ones please pass them along. 


Chocolate Truffles
from Chez Panisse Desserts

6 ounces semisweet chocolate (either weighed or measured from the bar)
1/2 ounce unsweetened chocolate
5 tablespoons whipping cream
1/2 cup unsalted butter (1 stick)
3/4 teaspoon Cognac, Chartrueuse, Grand Marnier or other flavoring (I used Cognac)
walnuts, almonds, hazelnuts, chocolate, or cocoa powder for coating the truffles (optional)

Coarsely chop the chocolate and put in a double broiler (or glass bowl on top of a pot of simmering water) with the cream and butter.  Melt the mixture over hot water (not boiling), stirring until it is smooth and glossy.  Remove from the heat and stir in the Cognac (or other flavoring).  Set aside and chill thoroughly.  Once chilled, line a small cooking tray with parchment paper and prepare a cup of hot water.  Use a melon baller or a small cookie scooper to scoop out the truffles.  Dip the scoop your using into the hot water between each truffle.  This can be somewhat messy, but I found that making sure the chocolate is cold and keeping the water hot helps a bit.  If the chocolates break apart in the process, either pinch or roll them together to keep them as round as possible.

Though the original recipe said it would make 3 dozen, mine only made about 2 dozen - I think my scoop was larger than a melon baller.  Once you've made all of the balls chill them again before serving and before rolling them in fun toppings or they can be served as is.  I rolled my in toasted walnuts and cocoa powder for the party.

Stats: Made 2 dozen 1 inch round truffles
Time: 4 hours, but less than an hour of that was hands on
Seasonal Ingredients: I didn't use any seasonal ingredients, but they were all local (the chocolate was a mix of Guittard and Scharffen Berger) and organic. 

have a wonderful, chocolate-filled, weekend!
alison

May 11, 2010

Homemade Tomato Sauce

So my friends, this is post is long overdue, and I can only chalk that up to having vacation-head for the past couple weeks.  Matt and I just got back from a vacation to Spain, which I will totally dedicate another post to because it was phenomenal.  Though we've been back a week, it has taken some time to get back into the routine and find my blogging voice again.

Since we're already half-way through the month I'm just going to work from my own journal this month and create meals, and treats as days go by. I'll try to blog my way through the month as much as possible.  In the mean time I wanted to be sure and post this fantastic tomato sauce recipe.  For those of you in the southern hemisphere, this might be perfect timing. For the rest of us up north, stash this one away for a few months until the tomatoes are fresh and overflowing from all the markets. 


This recipe comes from the life-changing (at least for me) book, Animal, Vegetable, Miracle by Barbara Kingsolver.  I've been a Kingsolver fan for years and have probably read all of her books at least once.  I think I was pretty in the dark a couple years ago when I picked this one up in terms of how life changing it would be.  Assuming it was just another good story, I dove into the book.  It was a good story, one of her best I would say.  And it was so much more.  I remember re-reading sections and fantasizing having a farm of my own one day.  For me this book brought to life this way of life that I had glimpses of before and yet hadn't put it all together yet in my mind.  Local, sustainable, following the seasons, eating what you grew...it all just made sense.


Though there are recipes sprinkled throughout as Kingsolver walks us through the seasons, this is the first one I've tried.

Because I decided to can the tomato sauce I stuck very closely to the original recipe (for acidic reasons), however if your freezing or cutting the recipe way back you have a lot more room to experiment.


Family Secret Tomato Sauce
from Animal, Vegetable, Miracle

10 quarts tomato puree (about 30 pounds of tomatoes - I had 29 and a half!)
4 large onions, chopped
1 cup dried basil
1/2 cup honey
4 tablespoons dried oregano
3 tablespoons salt
2 tablespoons ground dried lemon peel (I zested enough lemons to make 2 T, but did not dry them before using)
2 tablespoons thyme
2 tablespoons garlic powder
2 tablespoons dried parsley
2 teaspoons pepper
2 teaspoons cinnamon
1/2 teaspoon nutmeg
bottled lemon juice or citric acid if canning (this is not optional for the canning process)

Soften onions in a heave 3-gallon kettle - add a small amount of water if necessary (no oil if canning, this is very important).  Add pureed tomatoes (mine were skinned and mashed up as they went into the pot) and all the seasonings, bring to a boil, and simmer on low heat for two to three hours until sauce has thickened as desired.  Stir frequently, especially toward the end, to avoid burning.

If canning continue with the directions below. If not, let cool and spoon into freezer bags for storage.

Meanwhile, if you have a separate canning pot, heat water to boiling to sterilize jars, and pour boiling water over jar lids.  I washed the jars well and dried them separately, as I don't have another large pot. Running the jars through the dishwasher would also work.  (If you've never canned before, I'd recommend reading a quick review of the canning process, as this can be tricky the first time around).

Add 2 tablespoons of lemon juice OR 1/2 teaspoon citric acid to each quart jar (half that much to pint jars). This ensures that the sauce will be safely acidic. When the sauce is ready, ladle it into the jars, leaving 1/2-inch headspace. Cap jars, lower gently into canner and boil for 35 minutes. Remove, cool, check all seals, and store.

We have already enjoyed this sauce on pasta, pizza and bruschetta, all to rave reviews.  Though it looks like a lot of work if you have a lot of tomatoes I definitely recommend trying it.

Stats: Made 5 quarts and 2 pints of sauce
Time: 4-5 hours from start to finish, but not all of that is active time
Seasonal Ingredients: I used tomatoes that I had picked last September, however the onions and lemons were fresh from the farmers' market.


Happy canning,
alison

Apr 13, 2010

Roasted Chicken with Sage, Celery and Blood Orange


For my first foray in to The Naked Chef I turned to this lovely recipe.  Though the original recipe called for guinea fowl, I decided to use a more easily found bird on this side of the pond, chicken.  Also, by making up a whole 5 pound chicken I easily had enough for leftovers of the original recipe for two of us, and we used the rest of the meat in chicken tacos later in the week.


What originally caught my eye about this recipe was the blood oranges.  Though spring vegetables and fruit are becoming more readily found out here on the West coast, I know for most folks in the northern hemisphere citrus and root veggies are still most prevalent in the markets.  The blood oranges become the base of the stuffing and gravy, making the whole dish full of citrus flavors and the chicken super moist.  We spooned it over orzo the first night and quinoa the second to make a lovely 2-pot meal.


Roasted Chicken with Sage, Celery and Blood Orange
adapted from The Naked Chef

one 5 lb chicken
6 blood oranges
1 cup chopped celery
1 small handful of fresh thyme*
sea salt and freshly ground pepper
1 tablespoon olive oil
6 cloves of garlic, whole and unpeeled
6 tablespoons butter
10 fresh sage leaves
1 1/2 cups dry white wine

Preheat the oven to 425 degrees F.  Remove anything inside the cavity of the chicken. Wash thoroughly inside and out and pat dry with paper towels.  Rub the cavity with a little salt and rub the outside with salt and pepper.  Let the chicken rest while you are preparing the stuffing. 

Cut off the ends of the oranges.  Stand them on one end and carefully slice off the peel (as close to where the flesh meets the skin as possible).  Then slice the oranges into rounds.  Combine the orange rounds, chopped celery, thyme, and small pinch of salt and pepper in a bowl and toss.  Stuff the cavity of the chicken with this filling, and with any excess stuff underneath the skin (right next to the breast).  Pull the drumsticks together at the base of the bird and tightly tie up with cooking string.

Heat a thick-bottomed pan and add the olive oil and the chicken.  Cook until lightly golden on all sides, then add the garlic, butter and sage and cook for 3-4 minutes until golden brown.  Add the wine in intervals, keeping the pan moist at all times.  Place in the oven for 45-55 minutes, checking every 10-15 minutes to top up the wine as necessary.  If the top starts getting to dark, place a tented piece of foil over the bird to slow the cooking process of the top outside skin.  The chicken will be roasted and partially steamed. 

When cooked (I double tested mine with a meat thermometer), carefully remove from the oven and place upside down on a dish, allowing all the juices and moisture to relax back into the breast for several minutes while you make the gravy.

To make the gravy, first discard the excess fat from the pan and place the pan over gentle heat.  Scoop out the stuffing from the cavity of the chicken and add to the pan with about 2/3 cup of wine.  As the wine boils stir lightly until the liquid has dissolved.  Squash the cooked garlic out of the skins with a spoon (capturing and discarding the skins), and pour any of the juices from the plate that the bird is resting on into the gravy.  Simmer and season to taste.

Serve carved chicken on a bed of grains (such as orzo), and pour gravy over the dish.

Stats: Serves 4, with leftovers
Time: About 1.5 hours from start to finish
Seasonal Ingredients: Blood oranges and celery from the farmers' market, local organic chicken

Alison's Notes:
*Be sure to pick the small leaves off the tougher stalks of the thyme, or pull out the sprigs of thyme before making the gravy.  I didn't do this and wish I had.  The flavor is fine, but when we were eating the chicken we had to pull out the thyme and it would have been more enjoyable to not worry about it.

Apr 11, 2010

Sunday Picture - Tomatoes + Seedlings Wk 2


I spent most of the afternoon/evening today working with these tomatoes.  All 30 pounds of them!  Let's just say my freezer has a lot more room in it than it did this morning.  With rain in the forecast I decided it would be the perfect day to finally make the sauce I saved all these beauties for. It feels like ages ago when we harvested them last August.  When I just couldn't look at another tomato; of course I laugh now, because I can't wait for them to come back. In the mean time the sauce that I made today will have to hold us over for the next 5 or 6 months. I'll be back later in the week with the step-by-step process I used for turning these tomatoes into scrumptious sauce.


Also, couldn't resist this picture.  This week our seedlings literally seemed to jump out of their pods.  It felt like overnight we went from having them just barely creeping above the surface of the soil, to standing tall and reaching for the sun.  Watching the constant changes and growth makes me very happy!

Finally, I wanted to bring up the cookbook of the month.  I know we are a week in, but I've been cooking out of a new one this month and have a backlog of recipes to share.  In honor of Jamie Oliver's show "Food Revolution" and his very inspiring "TED Talk" from February, I decided to cook out of the one book I have of his, The Naked Chef.  I've used this cookbook intermittently over the past couple years but never really studied it like I have during the past couple weeks.


happy cooking this week.
alison

Apr 4, 2010

Sunday Picture - New Growth


Here is a first glimpse at our new seedlings. These went in the ground a week ago today and are so amazing to watch. Every day Matt and I check to see what new growth has come up. They are like our new little family. Hopefully this is just the beginning of a flourishing garden for the year.

happy cooking this week!
alison

Apr 1, 2010

Paneer Curry with Peas


This recipe spoke to me for two reasons. First the peas. For some reason I am lacking recipes that highlights this lovely spring ingredient that is all over the bay area markets these days. And second the paneer. I've had paneer at Indian restaurants, but cooking with this mild Indian cheese had never crossed my mind and I'm always game to try something new.


So before I go any further I must say that I LOVE this recipe!! I want to shout as I type and write in all caps...but I'm holding back...because I don't want to be a shouter. I'm just saying it was fabulous! I know that I will make versions of it again and again just by tweaking the recipe for the season.

The best part (okay, at least I think the best part) is that it tasted like real Indian food, I mean the kind you get at a restaurant. Yes, you too can make restaurant style yummy Indian food.


The second best part was the paneer! I might have found a new favorite ingredient. Paneer is a fresh cow's-milk or buffalo's-milk cheese that is in a lot of native Indian dishes. I was so impressed how nicely it held together and how the flavor was not rich like most of the more western cheeses I'm used to. Instead it absorbed the flavor's of the curry nicely and was a good substitute for meat - making it an excellent vegetarian meal.


Have I raved enough? No? Okay, one more thing...if you've ever wanted to try something a little different, or to make your own Indian - this is your dish. That's it, I'm done.  

(If you try it let me know what you think, I'd love to hear if I'm crazy or if this really is amazing for anyone else).


Paneer Curry with Peas
adapted from Bon Appetit

2 tablespoons all-purpose flour
1 pound paneer, cut into 1 inch cubes (you could also you firm tofu)
5 tablespoons clarified butter (also called ghee, I found this in the butter section at the grocery)
1 large onion, cut into 1-2 inch pieces
1 teaspoon cumin seeds
2 tablespoons fresh ginger, peeled and minced
3 garlic cloves, minced
2 teaspoons ground coriander
1 serrano chile, minced with seeds (this added a healthy spice, so if your not a fan of spicy food either take out the seeds or use less chile)
1 28-ounce can crushed tomatoes with added puree (I used a quart of tomatoes I canned last fall)
1teaspoon turmeric
1 3/4 cups shelled fresh peas from about 1 3/4 pounds fresh peas in pods (frozen peas that are thawed would also work)
1 teaspoon garam masala
1/4 cup chopped fresh cilantro
Steamed rice

Place flour in a medium - to - large bowl (go bigger rather than smaller here).  Add paneer to bowl, toss well to coat with flour.  Heat 2 tablespoons clarified butter to heavy large nonstick skillet over medium-high heat.  Shake excess flour from paneer; add to skillet and cook until browned in spots, stirring to toss.  This should take about 5-7 minutes.  Using a slotted spoon, transfer paneer to plate and set aside.

Place onion pieces in processor. Pulse until finely chopped but not watery. Heat remaining 3 tablespoons clarified butter in the skillet used for the paneer over medium heat.  Add cumin seeds and stir until aromatic (careful not to burn these, it doesn't take very long). Add chopped onion and cook until beginning to brown, stirring often, about 10 minutes. Add ginger, garlic, coriander and chile; stir 1 minute.  (Note: This is the base of your dish, it bring immense flavor so try not to skimp or change the ingredients from the onion to the chilie.) Add crushed tomatoes and turmeric; bring to a simmer.  Reduce heat to medium low; cover and simmer until mixture thickens slightly and flavors come together, stirring occasionally.

If serving with steamed rice I would start it here. I used white jasmine rice and it only took about 15-20 minutes to cook.  If your rice takes longer be sure to begin the rice earlier so that everything comes together pretty close to the same time.

After about 15-20 minutes, once the mix has begun to thicken, add the peas and cooked paneer; folding into the curry to fully incorporate. Cook mixture over medium heat until peas are tender and paneer is heated through, stirring slowly every couple minutes.  Fold in garam masala and cilantro. Season to taste with salt and pepper.

To serve, scoop rice into a bowl and top with curry being sure to incorporate paneer, sauce and peas in the bowl.

Stats: Serves 4 as a main dish...with enough for seconds or leftovers
Time: Probably took an hour start to finish. 
Seasonal Ingredients: English Peas and cilantro


happy cooking.
alison